Source now available on github:
https://github.com/cbruen1/mvc4-many-to-many
So for part 2 of our saving many to many data we’re going to continue where we left off in part 1. I’ll show how to add courses to the system, how to list all available courses when creating a new user, and how to save one or more courses as part of a user’s profile.
First off in the MVC4ManyToManyContext class we override the OnModelCreating method. This is how we map the many to many relationship between UserProfile and Course:
protected override void OnModelCreating(DbModelBuilder modelBuilder)
{
    modelBuilder.Entity<UserProfile>()
    .HasMany(up => up.Courses)
    .WithMany(course => course.UserProfiles)
    .Map(mc =>
    {
        mc.ToTable("T_UserProfile_Course");
        mc.MapLeftKey("UserProfileID");
        mc.MapRightKey("CourseID");
    });

    base.OnModelCreating(modelBuilder);
}
Add a class called MockInitializer to the db project that will give us some courses to start with and means we don’t have to manually add them every time our db model changes:
using System.Data.Entity;
using MVC4ManyToManyDomain;
//...

public class MockInitializer : DropCreateDatabaseIfModelChanges<MVC4ManyToManyContext>
{
    // Note: you can also use DropCreateDatabaseAlways to force a re-creation of your database
    protected override void Seed(MVC4ManyToManyContext context)
    {
        base.Seed(context);

        var course1 = new Course { CourseID = 1, CourseDescripcion = "Bird Watching" };
        var course2 = new Course { CourseID = 2, CourseDescripcion = "Basket weaving for beginners" };
        var course3 = new Course { CourseID = 3, CourseDescripcion = "Photography 101" };

        context.Courses.Add(course1);
        context.Courses.Add(course2);
        context.Courses.Add(course3);
    }
}
Add this line to Application_Start() in Global.asax to kick start the initializer, also add the necessary using statements:
using MVC4ManyToManyDatabase;
using System.Data.Entity;
//...

Database.SetInitializer(new MockInitializer());
Next, to populate the course data and the Courses object of the UserProfileViewModel, add a private method to the controller called PopulateCourseData:
private ICollection<AssignedCourseData> PopulateCourseData()
{
    var courses = db.Courses;
    var assignedCourses = new List<AssignedCourseData>();

    foreach (var item in courses)
    {
        assignedCourses.Add(new AssignedCourseData
        {
            CourseID = item.CourseID,
            CourseDescription = item.CourseDescripcion,
            Assigned = false
        });
    }

    return assignedCourses;
}
Then update the Create action of the controller (the first one not the one decorated with HttpPost):
public ActionResult Create()
{
var userProfileViewModel = new UserProfileViewModel { Courses = PopulateCourseData() };

return View(userProfileViewModel);
}
Next we create an Editor Template – Editor Templates are very useful and are especially suited for rendering collections of objects and naming the fields correctly for the MVC model binder. I have a write up about them here:
Editor Templates are by convention named the same as the object model they operate on (it’s also possible to name them differently to their model but let’s stick with convention). In your Views\Shared folder create a new folder called EditorTemplates if you don’t already have one. Add a new partial view called AssignedCourseData and paste the code below. This is the bit of magic that renders and names all your check boxes correctly – you don’t need a for each loop as the Editor Template will create all the items passed in a collection:
@model AssignedCourseData
@using MVC4ManyToMany.Models.ViewModels;

<fieldset>
    @Html.HiddenFor(model => model.CourseID)
    @Html.CheckBoxFor(model => model.Assigned)
    @Html.DisplayFor(model => model.CourseDescription)
</fieldset>
Add the following line to the UserProfile\Create.cshtml view just before the submit button:
@* Render the check boxes using the Editor Template *@
@Html.EditorFor(x => x.Courses)
This will render the field names correctly so they are part of the UserProfileViewModel when the form is posted back to the Controller. When rendered if you view source you will see that the fields have been named as such:
<fieldset>
    <input data-val="true" data-val-number="The field CourseID must be a number." data-val-required="The CourseID field is required." id="Courses_0__CourseID" name="Courses[0].CourseID" type="hidden" value="1" />
    <input data-val="true" data-val-required="The Assigned field is required." id="Courses_0__Assigned" name="Courses[0].Assigned" type="checkbox" value="true" /><input name="Courses[0].Assigned" type="hidden" value="false" />
    Bird Watching
</fieldset>
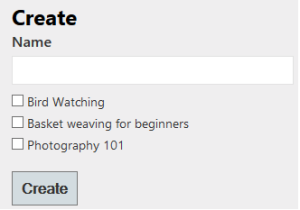
The fields for the other courses will be named similarly except will be indexed with 1, 2 etc. So here’s our Create form with a Name field and the available courses rendered as check boxes:
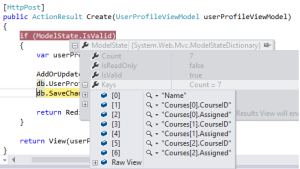
Once the form is posted back our AddOrUpdateCourses method gets called into action. This was already present but wasn’t utilised because we didn’t have any courses. Once the courses are part of the user profile EF takes care of the associations. It will add a record for each course selected to the T_UserProfile_Course table created in OnModelCreating. Here’s the Create action result method showing the courses posted back :
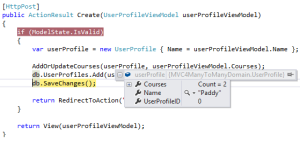
I selected 2 courses and you can see that the courses have been added to the new user profile object, the name is what we entered in the Name text box, and the UserProfileID is 0 meaning that EF will create a new record for us:
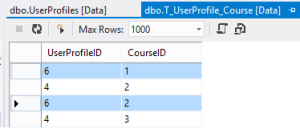
Here’s the records after saving to the DB:
So that ends part 2 of saving many to many records in MVC with Entity Framework. What we’ve seen:
– Multi tier MVC4 project utilising Entity Framework.
– Creating a many to many table structure in our database using code first
– Adding child collections to our objects that lets Users have multiple Courses and Courses have multiple Users
– Using an Editor Template to render child collections and naming the fields in the correct format for the MVC model binder


15 comments
Comments feed for this article
January 28, 2013 at 2:52 pm
Renish
Very good article.
I think there is some correction needed in this article. In “MVC4ManyToManyContext” the “OnModelCreating” has
modelBuilder.Entity()
I believe it should be
modelBuilder.Entity()
Regards,
Renish
January 28, 2013 at 2:57 pm
Renish
The editor of wordpress parses the “<” “>” so trying it again
modelBuilder.Entity < UserProfile > ()
January 28, 2013 at 3:57 pm
Renish
One more correction I forgot to mention:
in UserProfileController the “public ActionResult Create()” should pass the courses by calling PopulateCoruseData()
e.g.
var userProfileViewModel = new UserProfileViewModel { Courses = PopulateCourseData() };
January 28, 2013 at 3:53 pm
codenodes
Hi Renish, thanks well spotted. The code in the attached zip file is correct so I’ve updated the post with the changes.
February 18, 2013 at 7:40 pm
Lucia Castaldo
I followed your tutorial but I am getting this
error
Compiler Error Message: CS0029: Cannot implicitly convert type ‘System.Collections.Generic.ICollection’ to ‘bool’
it comes from the partial view created in the editorTemplates Folder,
thanks
February 18, 2013 at 8:01 pm
codenodes
Hi Lucia, can you tel me the exact line the error is on and what you’re doing when it happens? Also have you downloaded the solution from the attachments on the left? If you open that solution you can compare the code in that to what’s happening in your code..
March 1, 2013 at 6:44 pm
Luis
Hi, could you add how to implement the update/delete methods? for this very same project?
March 1, 2013 at 6:52 pm
codenodes
Hi Luis, yes it’s in the pipeline just need to find time for it…stay tuned 🙂
April 14, 2013 at 4:09 pm
codenodes
Hi Luis – project has been updated hope you find it useful…Ciaran
March 12, 2013 at 10:30 pm
Dean
The downloaded code just errors out when you attempt to view details or edit the record.
March 12, 2013 at 10:33 pm
Dean
It gives a “resource not found” error.
March 13, 2013 at 7:14 am
codenodes
Hi Dean – there’s no Edit, Details, or Delete views yet. The links are there for each user as they’re created by default in the Index view. I plan to do a third post to implement this functionality so it’s in the pipeline 🙂
March 13, 2013 at 6:46 pm
Dean
Ah I see. Any timeframe on that? 🙂
To me, thats the most important part, so I’d love to see it.
March 13, 2013 at 8:00 pm
codenodes
Been flat out in work lately but will get on it as soon as I can..thanks for showing interest stay tuned 🙂
April 14, 2013 at 4:08 pm
codenodes
Hi Dean – I’ve updated the code so we now have Edit, Details, and Delete functionality…hope you find it useful…Ciaran